Privacy dApps with ZK
Scroll has been a pioneer in zk dapp support from the start, enabling tools like Circom, Noir, and ZoKrates. Today, we’re building a privacy-focused app that leverages Scroll’s low fees, fast blocks, and zk-native guarantees to unlock new use cases.
Users need privacy in finance, identity, and social interactions but web3 is public by design. The solution is browser-based proving: generating zk proofs locally, before any data touches the internet. This keeps user data secure and private by default.
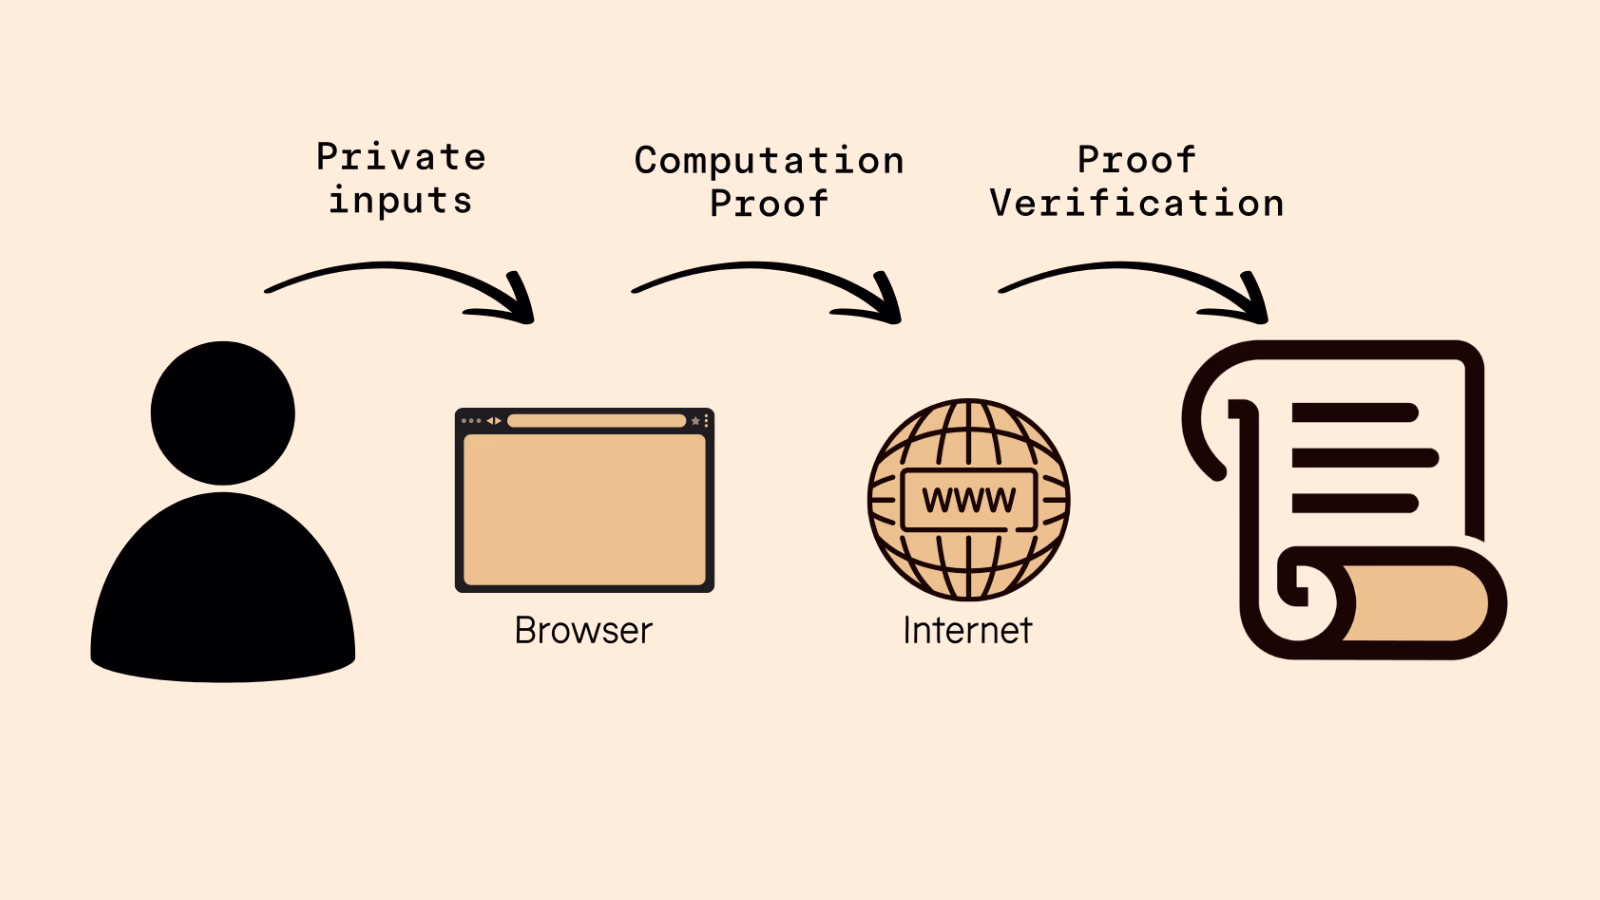
In order to keep the paramaters private, they should never get out of the browser
Let’s get to know, with a practical and simple example, how to create interfaces that make use of zk-wasm, the technology that makes this possible.
Dependencies
For this example, we will use Circom. If you don’t have it installed, you can do so with the following commands.
curl --proto '=https' --tlsv1.2 https://sh.rustup.rs -sSf | shgit clone https://github.com/iden3/circom.gitcd circomcargo build --releasecargo install --path circomnpm install -g snarkjs1. Create a circuit
We’ll create a very simple example: generating a computation proof for a multiplication a*b=c while keeping a and b private. This will make a solid starting point before building real use cases.
Circom allows us to create circuits that generate execution proofs while obfuscating the parameters.
Start by creating the following circuit:
myCircuit.circom
pragma circom 2.0.0;
template Multiplier() {    signal input a;    signal input b;    signal output c;    c <== a*b; }
 component main = Multiplier();
Now compile it and generate the artifacts that we will use later.
circom myCircuit.circom --r1cs --wasm --symsnarkjs powersoftau new bn128 12 pot12_0000.ptau -vsnarkjs powersoftau contribute pot12_0000.ptau pot12_0001.ptau --name="First contribution" -vsnarkjs powersoftau prepare phase2 pot12_0001.ptau pot12_final.ptau -vsnarkjs groth16 setup myCircuit.r1cs pot12_final.ptau myCircuit_0000.zkeysnarkjs zkey contribute myCircuit_0000.zkey myCircuit_0001.zkey --name="1st Contributor Name" -vsnarkjs zkey export verificationkey myCircuit_0001.zkey verification_key.json2. Deploy the contracts
The following command will generate a verifier contract in the verifier.sol file. Deploy it on Scroll testnet by using the framework of your choice (we recommend either Remix for a borwser experience or Foundry as detailed in our getting started guide). This contract contains the verifyProof() function, which takes a computation proof made with our circuit as a parameter and returns true if the proof is correct.
snarkjs zkey export solidityverifier myCircuit_0001.zkey verifier.solNow deploy the following custom logic contract, passing the address of the verifier contract we deployed earlier as a constructor parameter. In this contract, you can add any desired logic in Solidity, such as vote counting in a voting system or the reception or sending of ERC20 tokens in an anonymous DeFi system. In this example, we will only store the result of the multiplication we did in our circuit.
// SPDX-License-Identifier: MIT
pragma solidity >=0.7.0 <0.9.0;
// Interface that allows verifing proofs by sending them as a call to the verifier contract we just deployedinterface ICircomVerifier {    function verifyProof(uint[2] calldata _pA, uint[2][2] calldata _pB, uint[2] calldata _pC, uint[1] calldata _pubSignals) external view returns (bool);}
// Contract that demonstrates the typical structure of a ZK verifer with custom logic in Soliditycontract CircomCustomLogic {    ICircomVerifier circomVerifier;    uint public publicInput;
    // Recieves a valid circom verifer contract address that was autogenerated by snarkjs    constructor(address circomVeriferAddress) {        circomVerifier = ICircomVerifier(circomVeriferAddress);    }
    // Typical proof verifying function, execute custom logic if the proof passed as parameter is correct    function sendProof(uint[2] calldata _pA, uint[2][2] calldata _pB, uint[2] calldata _pC, uint[1] calldata _pubSignals) public {        // ZK verification        circomVerifier.verifyProof(_pA, _pB, _pC, _pubSignals);
        // Your custom logic, in this case just storing the multiplication result        publicInput = _pubSignals[0];    }}
3. Build a frontend
Let’s start by creating a new wagmi frontend in react with the snarkjs dependency that will help us building ZK proofs.
cd ..pnpm create wagmi zk-tutorial -t vite-reactcd frontendpnpm install snarkjsNow create this file structure where you populate the zk_artifacts with the build result in your circuit drectory and add the typescript files as detailed below:
zk-tutorial/├── public/│ └── zk_artifacts/│ ├── myCircuit.wasm│ ├── myCircuit_final.zkey│ └── verification_key.json├── src/│ ├── components/│ │ └── ZKForm.tsx│ └── App.tsx├── index.html├── tsconfig.json├── env.local└── package.jsonAdd the address of the CircomCustomLogic you just deployed to the environment files.
zk-tutorial/env.local
VITE_COUNTER_CONTRACT_ADDRESS=0xYourNewContractAddressNow implement the ZK and web3 logic in a new component.
zk-tutorial/src/components/ZKForm.tsx
import { useAccount, useWriteContract } from 'wagmi'import { createPublicClient, http } from 'viem'import { scrollSepolia } from 'viem/chains'import { useState, useEffect } from 'react'import { groth16 } from "snarkjs";
// Custom logic contract we just deployedconst CONTRACT_ADDRESS = import.meta.env.VITE_CIRCOM_CUSTOM_LOGIC_CONTRACT_ADDRESS as `0x${string}`
// In this tutorial we'll use Scroll Sepolia, but this code can also be used on Scroll Mainnet or any EVM chain that supports all precompiles needed for ZK proofconst publicClient = createPublicClient({  chain: scrollSepolia,  transport: http()})
// Custom logic contract ABI to be able to send proofs on-chainconst verifierAbi = [  {    "inputs": [      {        "internalType": "uint256[2]",        "name": "_pA",        "type": "uint256[2]"      },      {        "internalType": "uint256[2][2]",        "name": "_pB",        "type": "uint256[2][2]"      },      {        "internalType": "uint256[2]",        "name": "_pC",        "type": "uint256[2]"      },      {        "internalType": "uint256[1]",        "name": "_pubSignals",        "type": "uint256[1]"      }    ],    "name": "sendProof",    "outputs": [],    "stateMutability": "nonpayable",    "type": "function"  },  {    "inputs": [],    "name": "publicInput",    "outputs": [      {        "internalType": "uint256",        "name": "",        "type": "uint256"      }    ],    "stateMutability": "view",    "type": "function"  }] as const
// Function responsible to generate private computation on the browser and then sending the computation proof on-chainfunction useZKForm() {  const [a, setA] = useState<string>("")  const [b, setB] = useState<string>("")  const [message, setMessage] = useState<string>("Connect your wallet")  const [publicInput, setPublicInput] = useState<number | null>(null)  const { writeContract, isPending: isSendingProof } = useWriteContract()
  // Reads the contract state, in this case the multiplication result that was previously submmited  const fetchPublicInput = async () => {    try {      const result = await publicClient.readContract({        address: CONTRACT_ADDRESS,        abi: verifierAbi,        functionName: "publicInput",      })      setPublicInput(Number(result))    } catch (err) {      console.error("Error fetching public input:", err)    }  }
  // Generates the ZK proof based on private parameters, and then sends the proofs to the smart contract on Scroll  const sendProof = async () => {    setMessage("Generating proof...")
    // Let's start by generating a proof by passing private inputs and the ZK artifacts generated by the circom compiler    // Notice the ZK artifacts should be shared publicly in your website    const { proof, publicSignals } = await groth16.fullProve(      { a: Number(a), b: Number(b) },      "./zk_artifacts/myCircuit.wasm",      "./zk_artifacts/myCircuit_final.zkey"    )
    // Now let's verify the proof locally, this is optional    setMessage("Verifying off‑chain...")    const vkey = await fetch("/verification_key.json").then((r) =>      r.json()    )    const valid = await groth16.verify(vkey, publicSignals, proof)    if (!valid) {      setMessage("Proof verification failed")      return    }
    // We now translate the proof in a format compatible with what our smart contract expects    const pA = proof.pi_a.slice(0, 2)  // Take first two elements    const pB = proof.pi_b.slice(0, 2).map((row: string[]) => row.slice(0, 2))    const pC = proof.pi_c.slice(0, 2)
    // Once the proof is ready we send it on-chain    setMessage("Proof generated please confirm transaction.")    writeContract({      address: CONTRACT_ADDRESS,      abi: verifierAbi,      functionName: "sendProof",      args: [pA, pB, pC, publicSignals],    }, {      onSuccess: (txHash) => {        setMessage("Executing...")        publicClient.waitForTransactionReceipt({ hash: txHash })          .then(() => {            setMessage("Success!")            fetchPublicInput()          })          .catch((err) => {            console.error("ERROR! Transaction reverted:", err)            setMessage("Transaction failed")          })      },      onError: (err) => {        console.error("ERROR! Transaction reverted:", err)        setMessage("Transaction failed")      }    })  }
  return {    a,    setA,    b,    setB,    message,    publicInput,    isSendingProof,    sendProof,    fetchPublicInput  }}
// React UI that handles contract reads, and private inputs for the ZK proof generationexport default function ZKForm() {  const account = useAccount()  const {    a, setA,    b, setB,    message,    publicInput,    isSendingProof,    sendProof,    fetchPublicInput  } = useZKForm()
  useEffect(() => {    if (account.status === 'connected') {      fetchPublicInput()    }  }, [account.status, fetchPublicInput])
  return (    <div className="p-4 max-w-md mx-auto">      <h2 className="text-xl font-semibold mb-2">ZK Multiplication</h2>      <p className="mb-4 text-sm text-gray-600">{message}</p>      <input        className="border p-2 mb-2 w-full"        type="number"        placeholder="a"        value={a}        onChange={(e) => setA(e.target.value)}      />      <input        className="border p-2 mb-4 w-full"        type="number"        placeholder="b"        value={b}        onChange={(e) => setB(e.target.value)}      />      {account.status === 'connected' && (        <button          onClick={sendProof}          disabled={isSendingProof}          className="bg-blue-600 text-white px-4 py-2 rounded disabled:opacity-50"        >          {isSendingProof ? 'Sending...' : 'Send Proof'}        </button>      )}      {publicInput !== null && (        <p className="mt-4 text-sm text-gray-700">          Last stored result: {publicInput}        </p>      )}    </div>  )}
Add the new component to your app.
zk-tutorial/src/App.tsx
import { useAccount, useConnect, useDisconnect } from 'wagmi'// Import your ZKFormimport ZKForm from "./components/ZKForm";
function App() {  const account = useAccount()  const { connectors, connect, status, error } = useConnect()  const { disconnect } = useDisconnect()
  return (    <>      <div>        <h2>Account</h2>
        <div>          status: {account.status}          <br />          addresses: {JSON.stringify(account.addresses)}          <br />          chainId: {account.chainId}        </div>
        {account.status === 'connected' && (          <button type="button" onClick={() => disconnect()}>            Disconnect          </button>        )}      </div>
      <div>        <h2>Connect</h2>        {connectors.map((connector) => (          <button            key={connector.uid}            onClick={() => connect({ connector })}            type="button"          >            {connector.name}          </button>        ))}        <div>{status}</div>        <div>{error?.message}</div>      </div>      <!-- And add it your dApp -->      <main className="min-h-screen bg-gray-100 py-10">        <h1 className="text-center text-3xl font-bold mb-6">ZK Tutorial</h1>      <ZKForm />    </main>    </>  )}
export default App
Finally, start the frontend.
pnpm run dev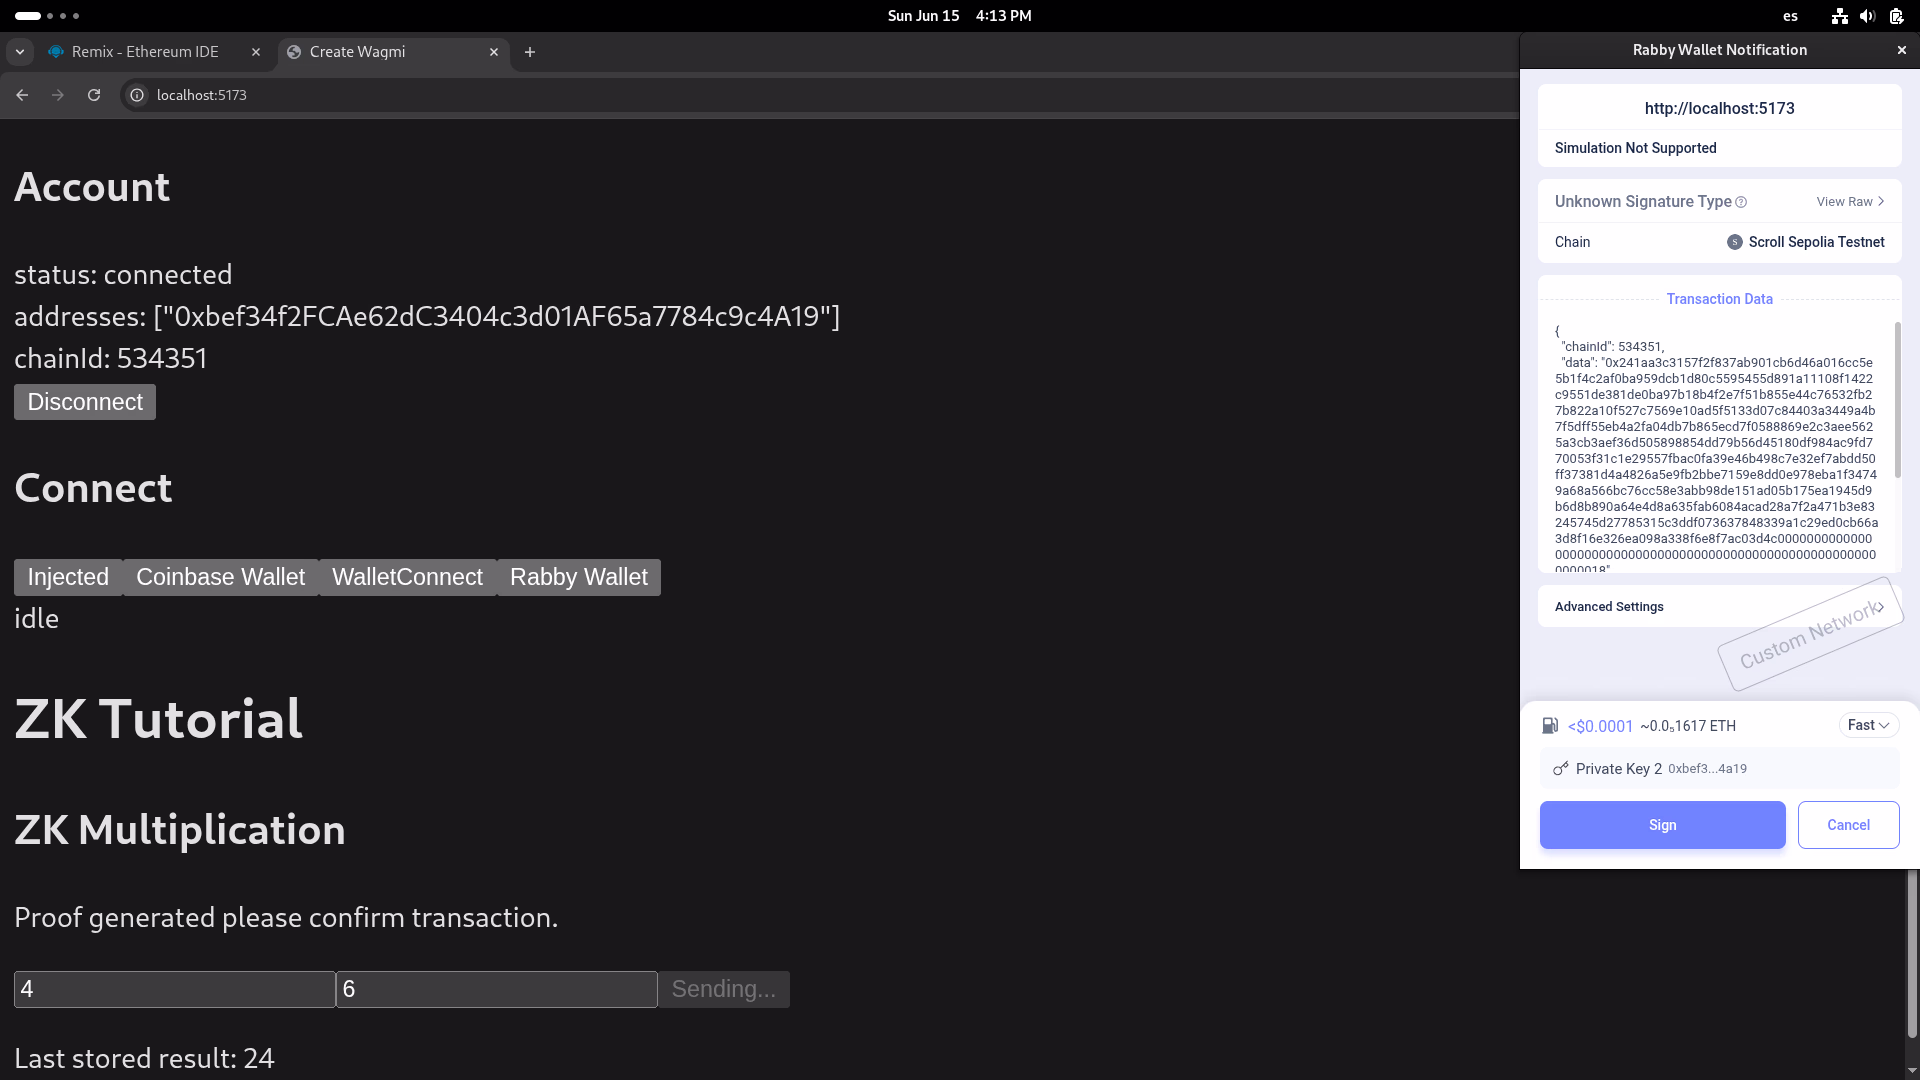
Once everything is ready this is how your app should look like
Now that you know the core parts of a zkDapp you can start experimenting with real use cases. ZK has demonstrated to serve DeFi, DiD, gamming and more. We’re excited to see what you will build on Scroll!
