AWS EKS Deployment
This guide demonstrates how to deploy a Scroll SDK on Amazon Web Services (AWS) using Elastic Kubernetes Service (EKS) and other managed services.
This guide is designed for chain owners and developers who may not be DevOps experts but want to understand the process of setting up a more sophisticated cloud deployment compared to a local devnet.
Getting your machine ready
Installing Prerequisites
Ensure you have the following tools installed on your local machine:
- AWS CLI
- eksctl
- kubectl
- Helm
- Docker
- Node.js ≥ 18
- jq
- scroll-sdk-cli
- k9s (optional, but recommended for cluster management)
Make sure to follow the installation instructions for each tool on their respective websites. For kubectl, you can refer to the detailed installation steps provided in the Amazon EKS documentation.
To install the latest version of scroll-sdk-cli, run:
npm install -g @scroll-tech/scroll-sdk-cliVerify your setup by running:
scrollsdk test dependenciesConfiguring AWS CLI
Before we begin, you need to configure your AWS CLI with your credentials:
- Create an IAM user in AWS with appropriate permissions (AdministratorAccess for simplicity, but you may want to restrict this in production).
- Get the Access Key ID and Secret Access Key for this user.
- Run the following command and enter your credentials when prompted:
aws configureThis will create a ~/.aws/credentials file with your AWS credentials.
Setting up your Owner Wallet
The chain owner has the ability to upgrade essential contracts. We recommend setting up a Safe with at least 2 independently controlled signers required for managing upgrades. You may also consider adding as signers any external party that will help you execute upgrades, as they’ll be able to propose new transactions.
For this demo, we’ll use a temporary development account created in MetaMask. Make sure to save the private key securely.
Setting up your infrastructure
Creating an EKS Cluster
Let’s create our EKS cluster using eksctl. Run the following command:
eksctl create cluster \ --name scroll-sdk-cluster \ --region us-west-2 \ --nodegroup-name standard-workers \ --node-type t3.2xlarge \ --nodes 3 \ --nodes-min 1 \ --nodes-max 4 \ --managedThis will create a cluster with 3 t3.2xlarge nodes, which should be sufficient for our needs. Adjust the region and node type as needed.
Configuring Persistent Storage
After creating your EKS cluster, you need to set up persistent storage using Amazon Elastic Block Store (EBS). This involves installing the EBS CSI driver, configuring IAM permissions, and setting a default storage class.
Installing the EBS CSI Driver
The EBS Container Storage Interface (CSI) driver allows your Kubernetes cluster to manage the lifecycle of Amazon EBS volumes for persistent storage.
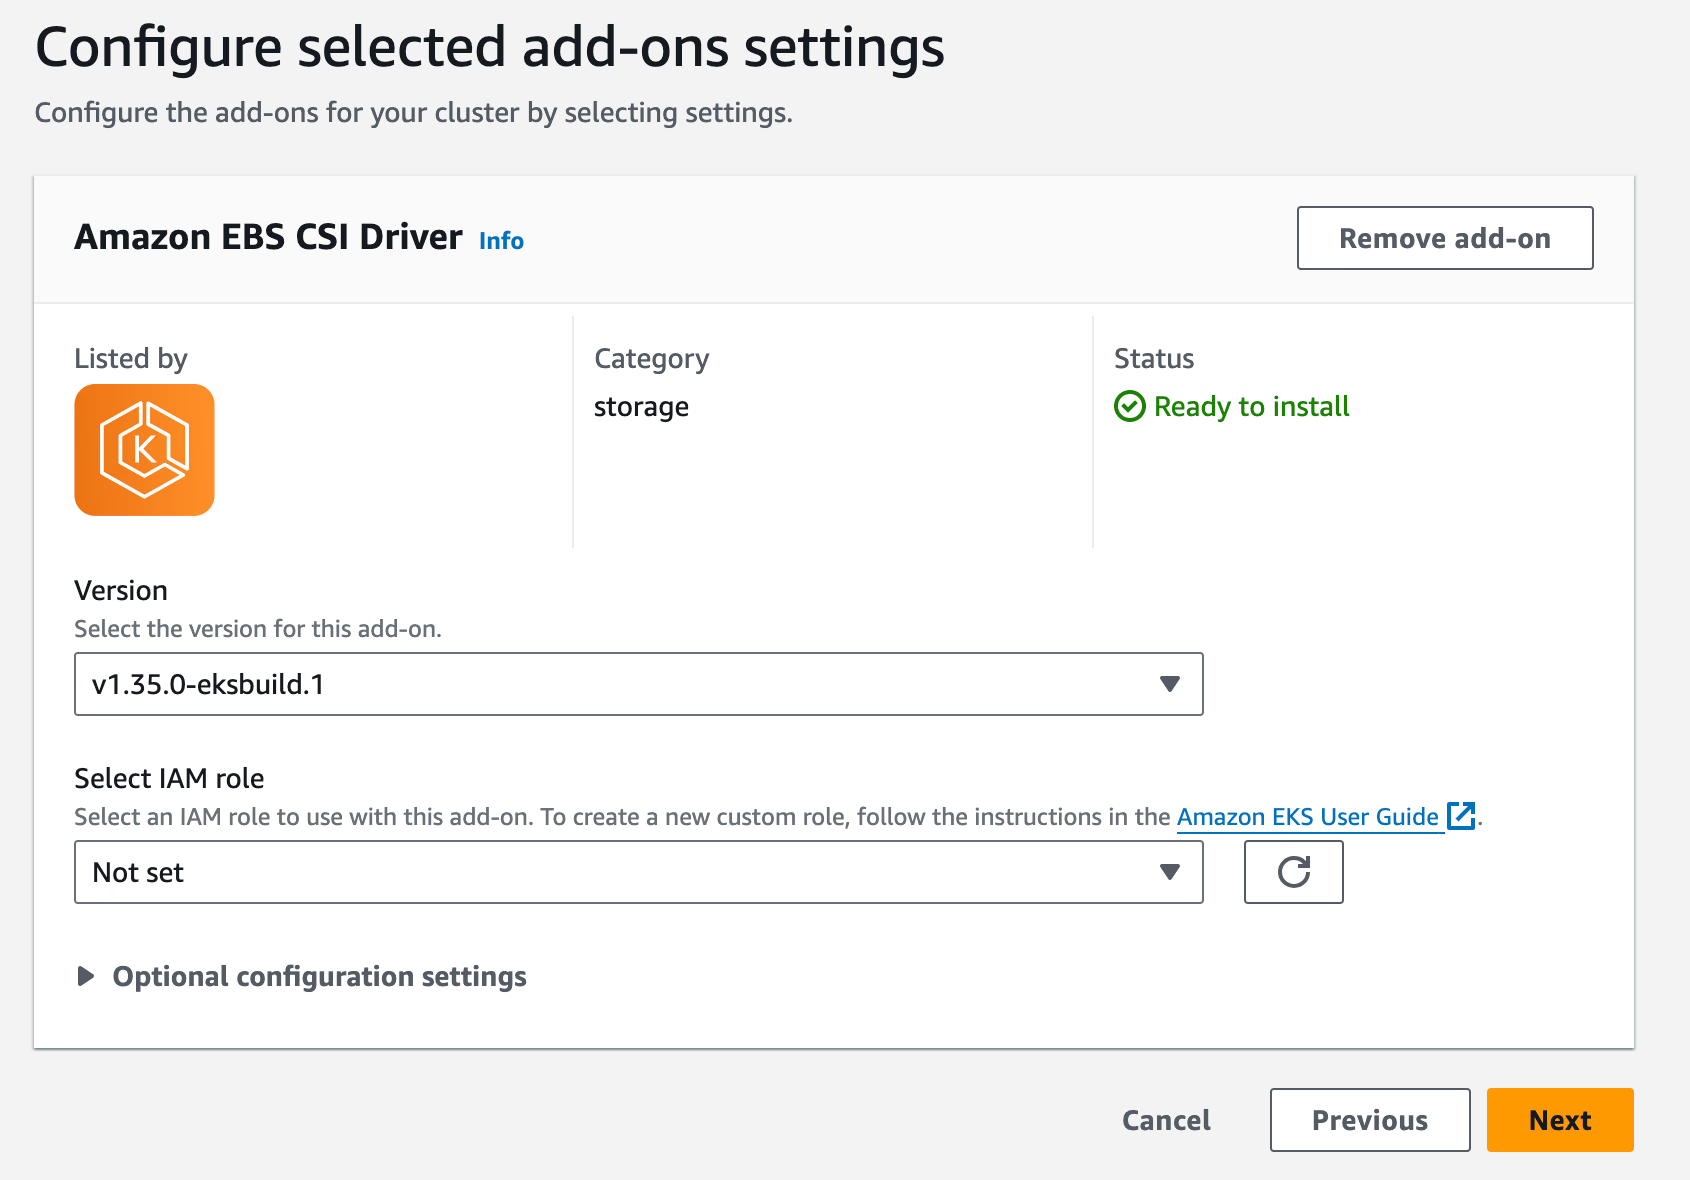
- Navigate to the EKS console for your cluster.
- Go to the “Add-ons” section and install the “Amazon EBS CSI Driver” add-on.
Configuring IAM Permissions
To allow your EKS nodes to interact with EBS volumes, attach the appropriate IAM policy:
# Create an EBS policy file named ebs-policy.json:{    "Version": "2012-10-17",    "Statement": [        {            "Effect": "Allow",            "Action": [                "ec2:CreateVolume",                "ec2:DeleteVolume",                "ec2:AttachVolume",                "ec2:DetachVolume",                "ec2:DescribeVolumes",                "ec2:DescribeVolumesModifications",                "ec2:ModifyVolume"            ],            "Resource": "*"        }    ]}
# Create the IAM policy:aws iam create-policy --policy-name EKSNodeEBSPolicy --policy-document file://ebs-policy.json
# Identify your node group's IAM role:aws eks describe-nodegroup --cluster-name scroll-sdk-cluster --nodegroup-name standard-workers --query "nodegroup.nodeRole" --output text --region us-west-2
# Attach the policy to the node group's role:aws iam attach-role-policy --role-name <YOUR_NODEGROUP_ROLE_NAME> --policy-arn arn:aws:iam::<YOUR_ACCOUNT_ID>:policy/EKSNodeEBSPolicy
Be sure to replace <YOUR_NODEGROUP_ROLE_NAME> and <YOUR_ACCOUNT_ID> with your specific details.
Setting the Default Storage Class
To ensure that your Kubernetes pods can automatically provision EBS volumes:
# Verify available storage classes:kubectl get sc
# Create a new gp3 storage class:cat <<EOF | kubectl apply -f -apiVersion: storage.k8s.io/v1kind: StorageClassmetadata:  name: gp3provisioner: ebs.csi.aws.comparameters:  type: gp3  encrypted: "true"volumeBindingMode: WaitForFirstConsumerEOF
# Set the gp3 storage class as the default:kubectl patch storageclass gp3 -p '{"metadata": {"annotations":{"storageclass.kubernetes.io/is-default-class":"true"}}}'
# Remove the default annotation from gp2 (if it exists):kubectl patch storageclass gp2 -p '{"metadata": {"annotations":{"storageclass.kubernetes.io/is-default-class":"false"}}}'
These steps will configure your EKS cluster to use gp3 EBS volumes for persistent storage, which is crucial for many components of the Scroll SDK deployment
Installing Kubernetes Add-Ons
We know we’ll want an Ingress Controller for handling inbound requests, a monitoring stack, and a certificate manager to support HTTPS connections. After your cluster is created, install the following add-ons:
- NGINX Ingress Controller
helm repo add nginx-stable https://kubernetes.github.io/ingress-nginxhelm repo updatehelm install nginx-ingress nginx-stable/ingress-nginx --namespace kube-system- Cert-Manager:
kubectl apply -f https://github.com/cert-manager/cert-manager/releases/download/v1.16.0/cert-manager.yamlCreating a Managed Database
scroll-sdk uses 3 distinct databases, with 2 additional databases used for L1 and L2 Blockscout instances if needed. We’ll set up a single database cluster that we’ll host each database and user inside. This will be described in depth later in the guide.
We’ll use Amazon RDS for our managed PostgreSQL database. Let’s set it up using the AWS CLI:
# First, let's get the VPC ID of our EKS clusterVPC_ID=$(aws eks describe-cluster --name scroll-sdk-cluster --region us-west-2 --query "cluster.resourcesVpcConfig.vpcId" --output text)
# Now, let's create a security group for our RDS instanceSECURITY_GROUP_ID=$(aws ec2 create-security-group --group-name scroll-sdk-db-sg --description "Security group for Scroll SDK RDS" --vpc-id $VPC_ID --output text --region us-west-2)
# Get the EKS cluster security group IDCLUSTER_SG_ID=$(aws ec2 describe-security-groups \--filters "Name=vpc-id,Values=$VPC_ID" "Name=group-name,Values=eks-cluster-sg-scroll-sdk-cluster-*" \--query "SecurityGroups[0].GroupId" --output text --region us-west-2)
# Allow inbound traffic on port 5432 (PostgreSQL) from the EKS cluster security groupaws ec2 authorize-security-group-ingress \--group-id $SECURITY_GROUP_ID \--protocol tcp \--port 5432 \--source-group $CLUSTER_SG_ID \--region us-west-2
# Get the public subnet IDs in the VPCSUBNET_IDS=$(aws ec2 describe-subnets --filters "Name=vpc-id,Values=$VPC_ID" "Name=map-public-ip-on-launch,Values=true" --query "Subnets[].SubnetId" --output json --region us-west-2)
# Create a DB subnet groupaws rds create-db-subnet-group \    --db-subnet-group-name scroll-sdk-subnet-group \    --db-subnet-group-description "Subnet group for Scroll SDK RDS" \    --subnet-ids $(echo $SUBNET_IDS | jq -r '.[]') \    --region us-west-2
# Now create the RDS instanceaws rds create-db-instance \    --db-instance-identifier scroll-sdk-db \    --db-instance-class db.t3.2xlarge \    --engine postgres \    --master-username scrolladmin \    --master-user-password <your-secure-password> \    --allocated-storage 20 \    --vpc-security-group-ids $SECURITY_GROUP_ID \    --db-subnet-group-name scroll-sdk-subnet-group \    --db-name scrolldb \    --publicly-accessible \    --region us-west-2
# Wait for the database to be availableaws rds wait db-instance-available --db-instance-identifier scroll-sdk-db --region us-west-2
This command sequence does the following:
- Gets the VPC ID of our EKS cluster
- Creates a new security group for our RDS instance in the same VPC
- Gets the security group ID for the EKS cluster
- Allows inbound PostgreSQL traffic from the EKS cluster security group
- Gets the subnet IDs in the VPC
- Creates a DB subnet group using the VPC subnets
- Creates a PostgreSQL database named
scrolldb - Uses a
db.t3.2xlargeinstance (suitable for testing, adjust as needed) - Sets the master username to
scrolladmin(change this as desired) - Allocates 20GB of storage
- Makes the database publicly accessible for initial setup (we’ll restrict access later)
- Creates the database in the
us-west-2region (adjust as needed)
Make sure to replace <your-secure-password> with a strong password.
After the database is created, you can retrieve its endpoint using:
aws rds describe-db-instances --db-instance-identifier scroll-sdk-db --query "DBInstances[0].Endpoint.Address" --output text --region us-west-2Make note of this endpoint, as you’ll need it when configuring your Scroll SDK.
Setting up a Load Balancer
When you install the NGINX Ingress Controller, it automatically creates an AWS Elastic Load Balancer (ELB) for you. This load balancer is used to route external traffic to your Kubernetes services.
To view the created load balancer:
-
Wait a few minutes after installing the NGINX Ingress Controller for the load balancer to be provisioned.
-
You can check the status of the load balancer creation by running:
kubectl get services -n kube-systemLook for a service named something like
nginx-ingress-ingress-nginx-controller. TheEXTERNAL-IPcolumn will show the DNS name of your load balancer once it’s ready. -
You can also view the load balancer in the AWS Console:
- Go to the EC2 dashboard
- Click on “Load Balancers” in the left sidebar
- You should see a new load balancer created for your NGINX Ingress Controller
Remember the DNS name of this load balancer, as you’ll need to point your domain to this address when configuring DNS.
We’ll configure the routing rules for this load balancer when we set up our ingress resources later in this guide.
Configuring your DNS with Cloudflare
We’ll use Cloudflare for DNS management, setting up a subdomain and a wildcard record. Here’s how to set it up:
-
If you haven’t already, create a Cloudflare account and add your domain to Cloudflare.
-
In the Cloudflare dashboard, go to the DNS settings for your domain.
-
Add two new DNS records:
a. Subdomain record:
- Type: CNAME
- Name: scrollsdk
- Target: Paste the DNS name of your AWS load balancer (the EXTERNAL-IP you noted earlier)
- Proxy status: Set to “DNS only” (grey cloud icon) to bypass Cloudflare’s proxy
b. Wildcard record:
- Type: CNAME
- Name: *.scrollsdk
- Target: scrollsdk.yourdomain.xyz
- Proxy status: Set to “DNS only” (grey cloud icon)
-
Save your changes.


Remember to update your Scroll SDK configuration to use these new subdomains. For example, you might use:
- frontends.scrollsdk.yourdomain.xyz for your frontend
- l2-rpc.scrollsdk.yourdomain.xyz for your API
Make sure to update these in your config.toml file and any other relevant configuration files.
Connecting to your Cluster
After creating the cluster, eksctl should have automatically updated your kubeconfig. Verify the connection by running:
kubectl get nodesYou should see your cluster nodes listed.
Adding External Secrets Operator
Scroll SDK uses External Secrets to manage sensitive information. Once you have kubectl working with your cluster, run the following:
helm repo add external-secrets https://charts.external-secrets.iohelm repo updatehelm install external-secrets external-secrets/external-secrets -n external-secrets --create-namespaceSetup your local repo
Create a directory for your project and initialize a git repository:
mkdir aws-scroll-sdk && cd aws-scroll-sdk && git initConfiguration
Grabbing Files from scroll-sdk
We’ll want two files from the scroll-sdk repo. You can either copy-paste the contents from GitHub or copy the files from another location you’ve cloned.
Here, I’ll copy them from a local repo copy.
cp ../scroll-sdk/examples/config.toml.example ./config.tomlcp ../scroll-sdk/examples/Makefile.example ./Makefilecp -r ../scroll-sdk/examples/values valuesConfig.toml will be used to set up the base configuration of our chain, from which each service’s independent config files will be generated. Makefile will allow us to directly run helm commands in an automated way. The values directory contains the starter values for each service’s production.yaml file, where we’ll customize the behavior of each chart.
Preparing our Config.toml file
Although these values can be set manually, we have a number of “setup” methods in the scroll-sdk-cli to help you quickly configure your stack.
Setting Domains
We want to set up our ingress hosts and the URLs used by our frontend sites. These will often be the same, but are defined separately to allow flexibility in architecture and usage of HTTP while in development.
If you’re using a public testnet like Scroll Sepolia, please have a private L1 RPC URL ready for HTTPS and WSS. Public RPC endpoints are too unreliable for supporting the SDK backend services.
First, run scrollsdk setup domains to begin an interactive session for setting the values.
Current domain configurations:EXTERNAL_RPC_URI_L1 = "http://l1-devnet.scrollsdk"EXTERNAL_RPC_URI_L2 = "http://l2-rpc.scrollsdk"BRIDGE_API_URI = "http://bridge-history-api.scrollsdk/api"ROLLUPSCAN_API_URI = "http://rollup-explorer-backend.scrollsdk/api"EXTERNAL_EXPLORER_URI_L1 = "http://l1-explorer.scrollsdk"EXTERNAL_EXPLORER_URI_L2 = "http://blockscout.scrollsdk"ADMIN_SYSTEM_DASHBOARD_URI = "http://admin-system-dashboard.scrollsdk"GRAFANA_URI = "http://grafana.scrollsdk"
Current ingress configurations:FRONTEND_HOST = "frontends.scrollsdk"BRIDGE_HISTORY_API_HOST = "bridge-history-api.scrollsdk"ROLLUP_EXPLORER_API_HOST = "rollup-explorer-backend.scrollsdk"COORDINATOR_API_HOST = "coordinator-api.scrollsdk"RPC_GATEWAY_HOST = "l2-rpc.scrollsdk"BLOCKSCOUT_HOST = "blockscout.scrollsdk"ADMIN_SYSTEM_DASHBOARD_HOST = "admin-system-dashboard.scrollsdk"L1_DEVNET_HOST = "l1-devnet.scrollsdk"L1_EXPLORER_HOST = "l1-explorer.scrollsdk"? Select the L1 network: Anvil (Local)? Enter the L1 Chain Name: l1-devnet? Enter the L1 Chain ID: 31337Using l1-devnet network:L1 Chain Name = "l1-devnet"L1 Chain ID = "31337"Updated [general] L1_RPC_ENDPOINT = "http://l1-devnet:8545"Updated [general] L1_RPC_ENDPOINT_WEBSOCKET = "ws://l1-devnet:8546"? Do you want all external URLs to share a URL ending? yes? Enter the shared URL ending: scrollsdk.yourdomain? Choose the protocol for the shared URLs: HTTPS? Do you want the frontends to be hosted at the root domain? (No will use a "frontends" subdomain) no
New domain configurations:EXTERNAL_RPC_URI_L2 = "https://l2-rpc.scrollsdk.yourdomain.xyz"BRIDGE_API_URI = "https://bridge-history-api.scrollsdk.yourdomain/api"ROLLUPSCAN_API_URI = "https://rollup-explorer-backend.scrollsdk.yourdomain/api"EXTERNAL_EXPLORER_URI_L2 = "https://blockscout.scrollsdk.yourdomain"ADMIN_SYSTEM_DASHBOARD_URI = "https://admin-system-dashboard.scrollsdk.yourdomain"EXTERNAL_RPC_URI_L1 = "https://l1-devnet.scrollsdk.yourdomain"EXTERNAL_EXPLORER_URI_L1 = "https://l1-explorer.scrollsdk.yourdomain"
New ingress configurations:FRONTEND_HOST = "frontends.scrollsdk.yourdomain"BRIDGE_HISTORY_API_HOST = "bridge-history-api.scrollsdk.yourdomain"ROLLUP_EXPLORER_API_HOST = "rollup-explorer-backend.scrollsdk.yourdomain"COORDINATOR_API_HOST = "coordinator-api.scrollsdk.yourdomain"RPC_GATEWAY_HOST = "l2-rpc.scrollsdk.yourdomain"BLOCKSCOUT_HOST = "blockscout.scrollsdk.yourdomain"ADMIN_SYSTEM_DASHBOARD_HOST = "admin-system-dashboard.scrollsdk.yourdomain"L1_DEVNET_HOST = "l1-devnet.scrollsdk.yourdomain"L1_EXPLORER_HOST = "l1-explorer.scrollsdk.yourdomain"
New general configurations:CHAIN_NAME_L1 = "l1-devnet"CHAIN_ID_L1 = "31337"L1_RPC_ENDPOINT = "http://l1-devnet:8545"L1_RPC_ENDPOINT_WEBSOCKET = "ws://l1-devnet:8546"? Do you want to update the config.toml file with these new confi{/* TODO: The prompt seems to be cut off. Ensure the instruction is complete. */}Initializing our Databases and Database Users
We need to temporarily allow public access to our RDS instance to run the initial setup. After setup, we’ll revert these changes to maintain security.
- Update the security group to allow inbound traffic from any IP:
aws ec2 authorize-security-group-ingress \--group-id $SECURITY_GROUP_ID \--protocol tcp \--port 5432 \--cidr 0.0.0.0/0 \--region us-west-2- Get the public endpoint of your RDS instance:
aws rds describe-db-instances \--db-instance-identifier scroll-sdk-db \--query 'DBInstances[0].Endpoint.Address' \--output text \--region us-west-2- Run the database initialization:
scrollsdk setup db-initNext, follow the prompts to create the new database users and passwords.
When prompted “Do you want to connect to a different database cluster for this database?”, type “no”.
Lastly, when asked “Do you want to update the config.toml file with the new DSNs?” select “yes” to update your config.
- Reverting RDS to Private Access:
After initializing your databases, it’s important to revert the RDS instance to private access for improved security. Follow these steps:
# 1. Remove the public accessibility:aws rds modify-db-instance \    --db-instance-identifier scroll-sdk-db \    --no-publicly-accessible \    --apply-immediately \    --region us-west-2
# 2. Remove the temporary security group rule that allowed public access:aws ec2 revoke-security-group-ingress \    --group-id $SECURITY_GROUP_ID \    --protocol tcp \    --port 5432 \    --cidr 0.0.0.0/0 \    --region us-west-2
# 3. Wait for the changes to take effect:aws rds wait db-instance-available --db-instance-identifier scroll-sdk-db --region us-west-2
These steps ensure that your RDS instance is only accessible from within your VPC, enhancing the security of your deployment.
Generate Keystore Files
Next, we need to generate new private keys for the sequencer signer and the SDK accounts used for on-chain activity. The prompt will also ask if you want to set up backup sequencers. These will be standby full nodes ready to take over the sequencer role if needed for recovery or key rotation. This step will also allow you to set up pre-defined bootnodes.
This step will also update L2_GETH_STATIC_PEERS to point to all sequencers as well.
Follow the prompt by running scrollsdk setup gen-keystore. Use the Owner wallet address of the multi-sig generated in the first step, or for testing, allow the script to generate a wallet for you. But, be sure to save the private key, as it should not be stored in config.toml!
Generate Configuration Files
Now, we’ll do the last steps for generating each service’s configuration files based on our values in config.toml.
Run scrollsdk setup configs.
You’ll see a few prompts to update a few remaining values, like the L1 height at contract deployment and the “deployment salt” which should be unique per new deployment with a deployer address.
Now, we’ll simulate contract deployment to get contract addresses and build the config files and secrets files for all SDK services. Secrets will be written to ./secrets and config files to ./values. If you want the config files written to a different directory, pass the --configs-dir flag.
Pull Charts and Move Config Files
Now, we need to prepare the Helm charts. We will check access to charts, review the Makefile, and check the values files for any missing values.
To do this, run scrollsdk setup prep-charts
After pulling the charts, the CLI tool will try to auto-fill each chart’s production.yaml file.
You will be prompted with each update and even flagged for empty values. Be sure to sanity check these values to make sure you didn’t set up something incorrectly earlier. If you did, re-run any earlier steps, being sure to rerun the setup configs command before running setup prep-charts.
Push Secrets
Lastly, we need to take the configuration values that are sensitive and publish them to wherever we’re deploying “secrets.”
We’ll use AWS Secrets Manager to store our secrets. First, let’s set up the necessary permissions and create a ServiceAccount:
- Create an IAM policy for accessing Secrets Manager:
cat <<EOF > secretsmanager-policy.json{    "Version": "2012-10-17",    "Statement": [        {            "Effect": "Allow",            "Action": [                "secretsmanager:GetSecretValue",                "secretsmanager:DescribeSecret",                "secretsmanager:PutSecretValue",                "secretsmanager:CreateSecret",                "secretsmanager:DeleteSecret",                "secretsmanager:TagResource"            ],            "Resource": "*"        }    ]}EOF
aws iam create-policy --policy-name ExternalSecretsPolicy --policy-document file://secretsmanager-policy.json- Associate an IAM OIDC provider with your cluster:
eksctl utils associate-iam-oidc-provider --region=us-west-2 --cluster=scroll-sdk-cluster --approve- Create a ServiceAccount and associate it with the IAM role:
eksctl create iamserviceaccount \ --name external-secrets \ --namespace default \ --cluster scroll-sdk-cluster \ --attach-policy-arn arn:aws:iam::YOUR_AWS_ACCOUNT_ID:policy/ExternalSecretsPolicy \ --approve \ --region us-west-2Remember to replace YOUR_AWS_ACCOUNT_ID with your actual AWS account ID.
- Create a SecretStore:
apiVersion: external-secrets.io/v1beta1kind: SecretStoremetadata: name: aws-secretsmanagerspec: provider: aws: service: SecretsManager region: us-west-2 auth: jwt: serviceAccountRef: name: external-secretsApply this configuration:
kubectl apply -f secretstore.yamlNow, push your secrets:
scrollsdk setup push-secretsSelect “AWS” when prompted.
You’ll be asked to update your production.yaml files, and we’ll be ready to deploy!
Enable TLS & HTTPS
Next, we’ll want to enable HTTPS access. You should have already enabled Cert Manager in the previous step.
Now, save the following file as cluster-issuer.yaml (being sure to use your own email address) then run kubectl apply -f cluster-issuer.yaml
apiVersion: cert-manager.io/v1kind: ClusterIssuermetadata: name: letsencrypt-prodspec: acme: server: https://acme-v02.api.letsencrypt.org/directory email: replace.this@email.com privateKeySecretRef: name: letsencrypt-prod solvers: - http01: ingress: class: nginxNext, run scrollsdk setup tls and walk through the instructions to update each of your production.yaml files that define an external hostname.
Deployment
Fund the Deployer
We need to send some Anvil Devnet ETH to the Deployer — 2 ETH should do it. Run the following if you want to use your mobile wallet or have forgotten the account.
scrollsdk helper fund-accounts -i -f 2-i is used for funding the deployer. Later we’ll run this with different params to fund other SDK accounts.
Now, let’s fund the other L1 accounts.
scrollsdk helper fund-accounts -f 0.2 -l 1Here, we pass -l 1 to only fund the L1 accounts. Any L2 funding will fail at this point since we haven’t launched the chain yet!
Installing the Helm Charts
Run make install to install (or later, to upgrade) all the SDK charts needed. It may help to run the commands one-by-one the first time and check the deployment status.
k9s is a useful tool for this. The sample Makefile also doesn’t include Blockscout, but feel free to add it as well.
Fund L2 accounts
Let’s fund our L1 Gas Oracle Sender (an account on L2 😅) with some funds.
scrollsdk helper fund-accounts -f 0.2 -l 2This will fund it with 0.2 of our gas token. Select “Directly fund L2 Wallet” for now, since our Deployer starts with 1 token on L2. But now we have a working chain, so we can start bridging funds!
Testing
scroll-sdk-cli has a number of tools built in for testing your new network. These commands should be run from the same directory as your config.toml and config-contracts.toml files.
Ingress
Run scrollsdk test ingress to check all ingresses and that they match the expected value. If you’re not using the default namespace, add -n [namespace].
Contracts
Run scrollsdk test contracts to check all contract deployments, initialization, and owner updates.
e2e Test
Run scrollsdk test e2e to try end-to-end testing. Without any flags, the test will create and fund a new wallet, but depending on Sepolia gas costs, you may need to manually fund the generated account with additional ETH. If the tests stop at any time, just run scrollsdk test e2e -r to resume from the saved file.
We recommend opening up another terminal and running scrollsdk helper activity -i 1 to generate traffic and produce more blocks — otherwise, finalization will be stopped.
Frontends
Go visit the frontends, connect your wallet, and try to bridge some funds!
Next Steps
Optimize EKS Node Groups for Specific Services
As you work with your network, you might want to be more selective about the node groups you provide to services.
One example is that the l2-sequencer may want additional CPU resources and the coordinator-api has RAM requirements far greater than other services.
If you’d like to give this a try, create a new node group in your EKS cluster — perhaps selecting instances with higher CPU and RAM.
Now, in your values/l2-sequencer-production-0.yaml file, add the following section:
affinity: nodeAffinity: requiredDuringSchedulingIgnoredDuringExecution: nodeSelectorTerms: - matchExpressions: - key: eks.amazonaws.com/nodegroup operator: In values: - high-performance-nodegroupresources: requests: memory: "450Mi" cpu: "80m" limits: memory: "14Gi" cpu: "7.5"Here, we’re asking it to only select nodes that are in the “high-performance-nodegroup” and increasing the resources of the pod to allow up to 7.5 CPU cores.
To apply this, run:
helm upgrade -i l2-sequencer-0 oci://ghcr.io/scroll-tech/scroll-sdk/helm/l2-sequencer \ --version=0.0.11 \ --values values/l2-sequencer-production-0.yamlReplace with the version value from your Makefile. Add -n [namespace] if you’re not using the default namespace.
For more info, see the Kubernetes page on Assigning Pods to Nodes.
Add Redundancy with Replicas
Soon, we’ll add more information about quickly adding Replicas.
For some components (like l2-rpc and all -api services), this is as easy as adding or modifying the following value in your production.yaml file:
controller: replicas: 2Some services do not support this without additional configurations (for example, l2-sequencer and l2-bootnode). We are working on additional info on how to properly run multiple services for load balancing between or for having redundant backups available.
Monitoring
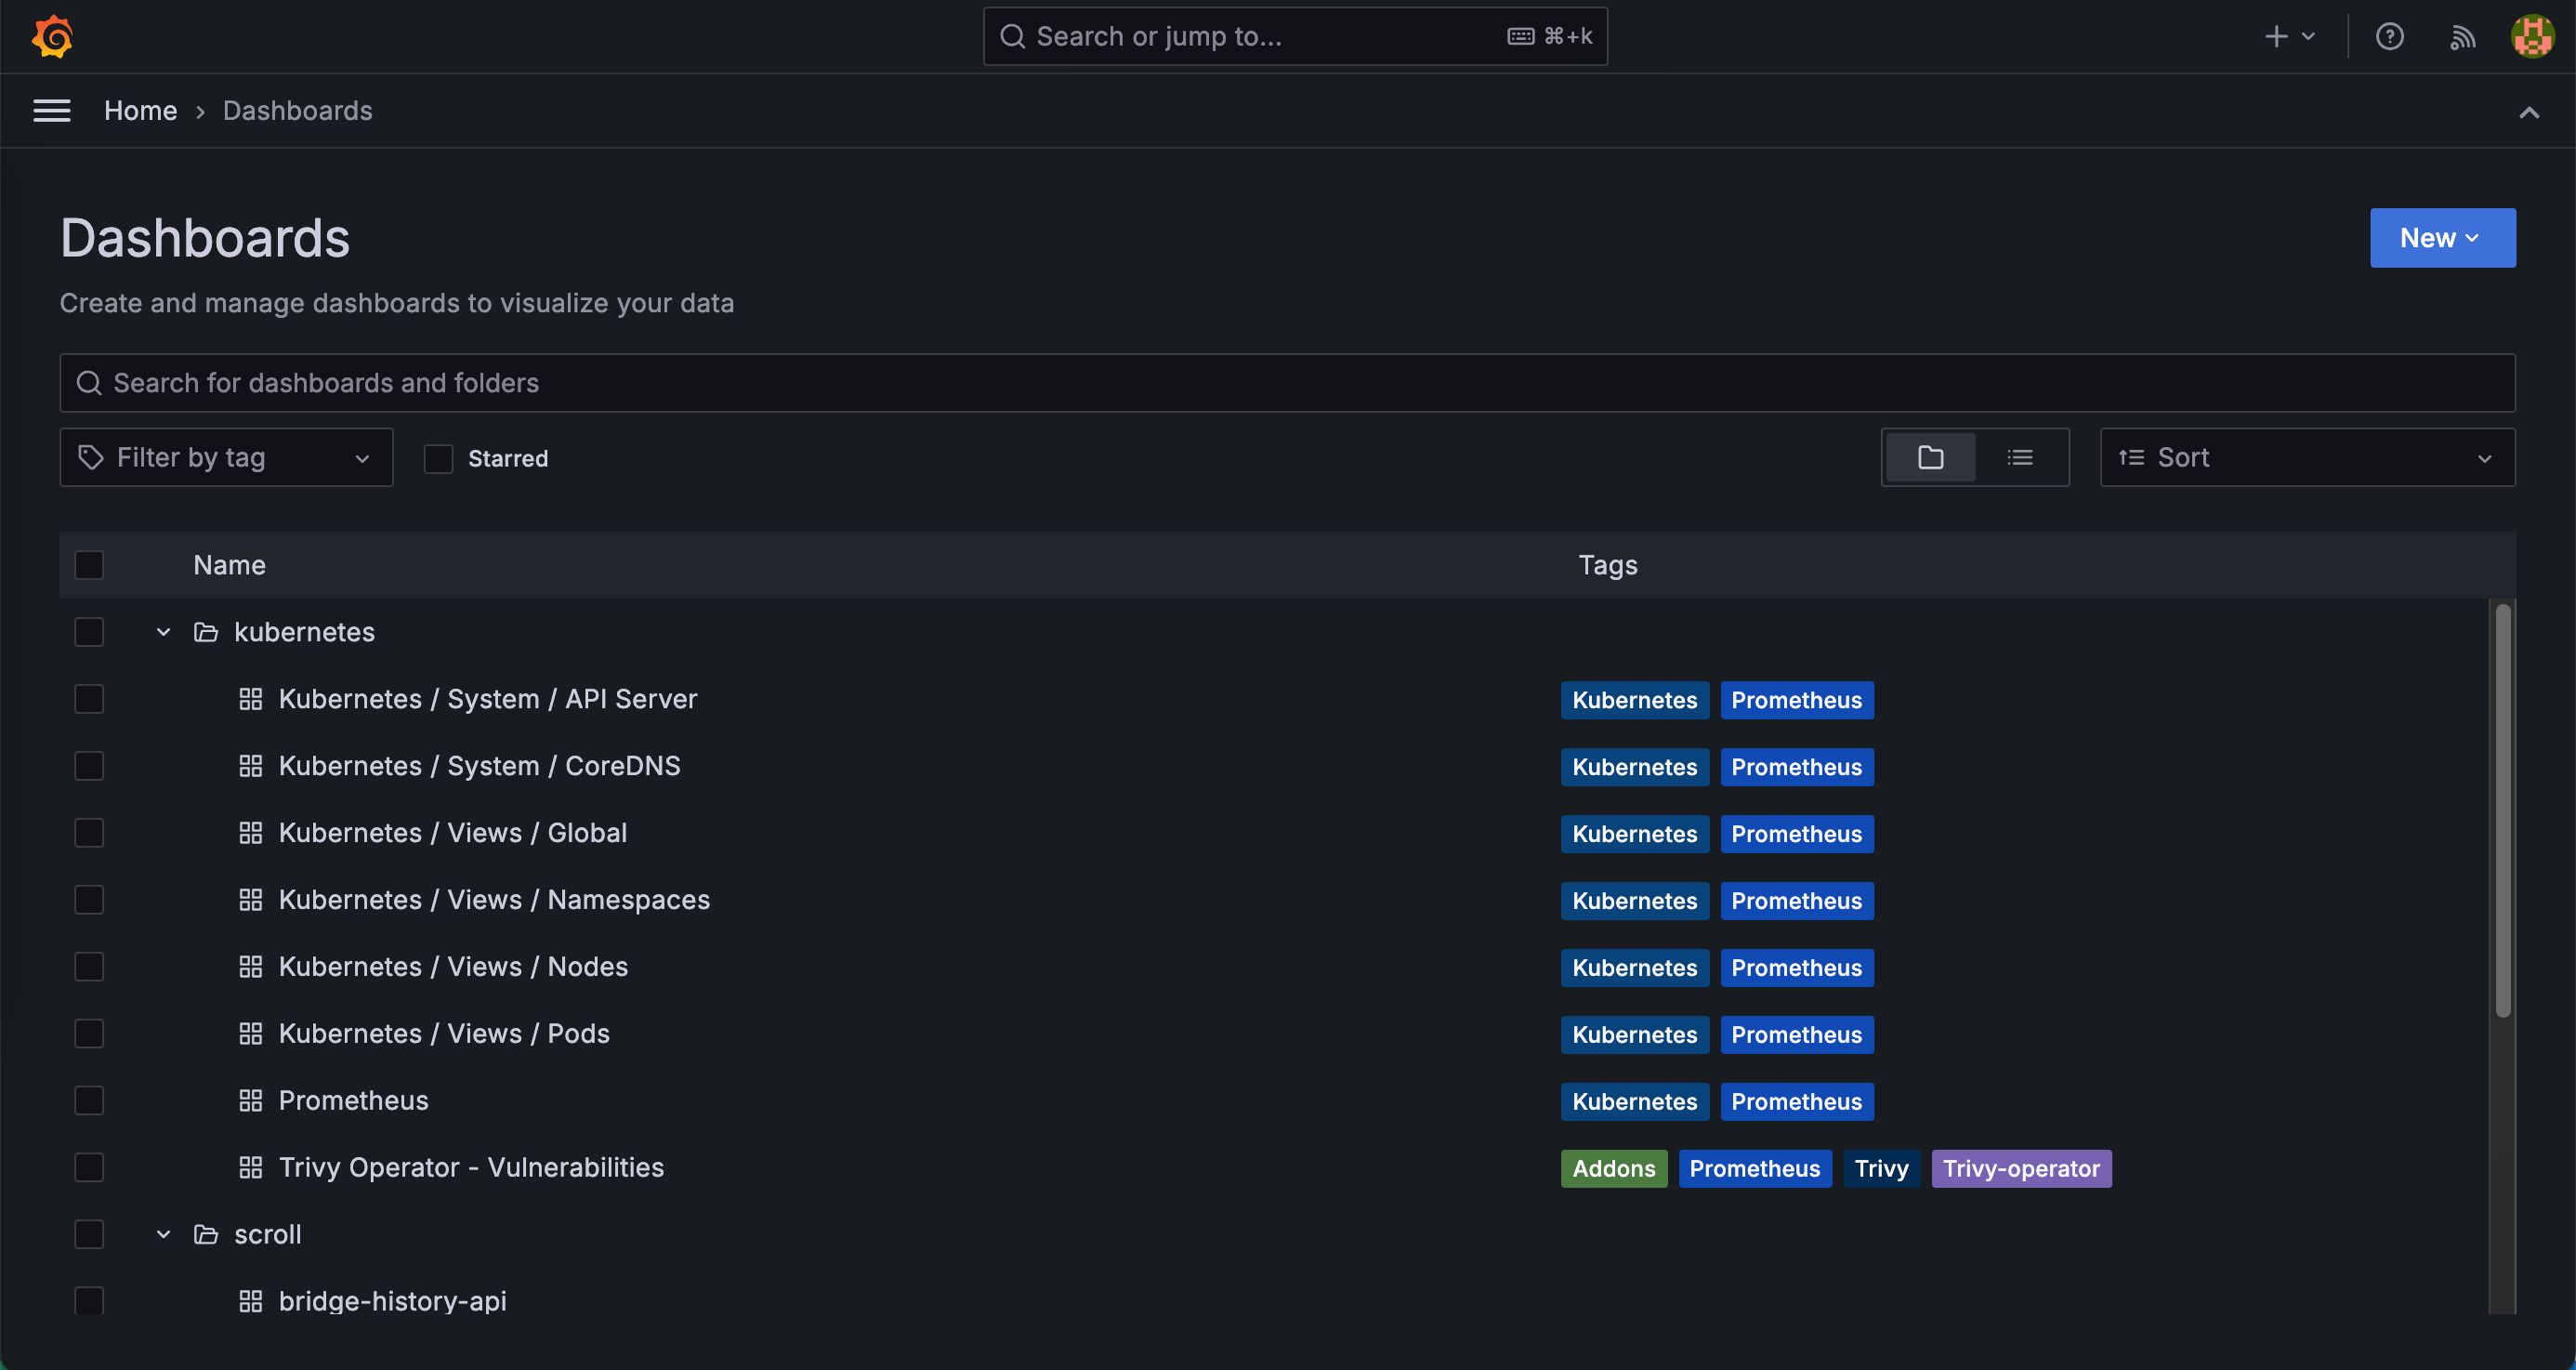
You can monitor the cluster’s running status through Grafana.
Additionally, you can send alerts via email and Slack using Alertmanager.
If you have configured a domain for Grafana in the previous steps, you can access it by opening http://grafana.yourdomain, where you will see two sets of dashboards. The defalt password of user admin is scroll-sdk.
send alert to slack
-
Create a Slack App
Open https://api.slack.com/apps and click
Create New Appif you don’t have one already. SelectFrom scratch, enter a name, and select the workspace. -
Activate Incoming Webhooks
Click the
Incoming Webhookslabel on the right side of the page, then turn onActivate Incoming Webhooks.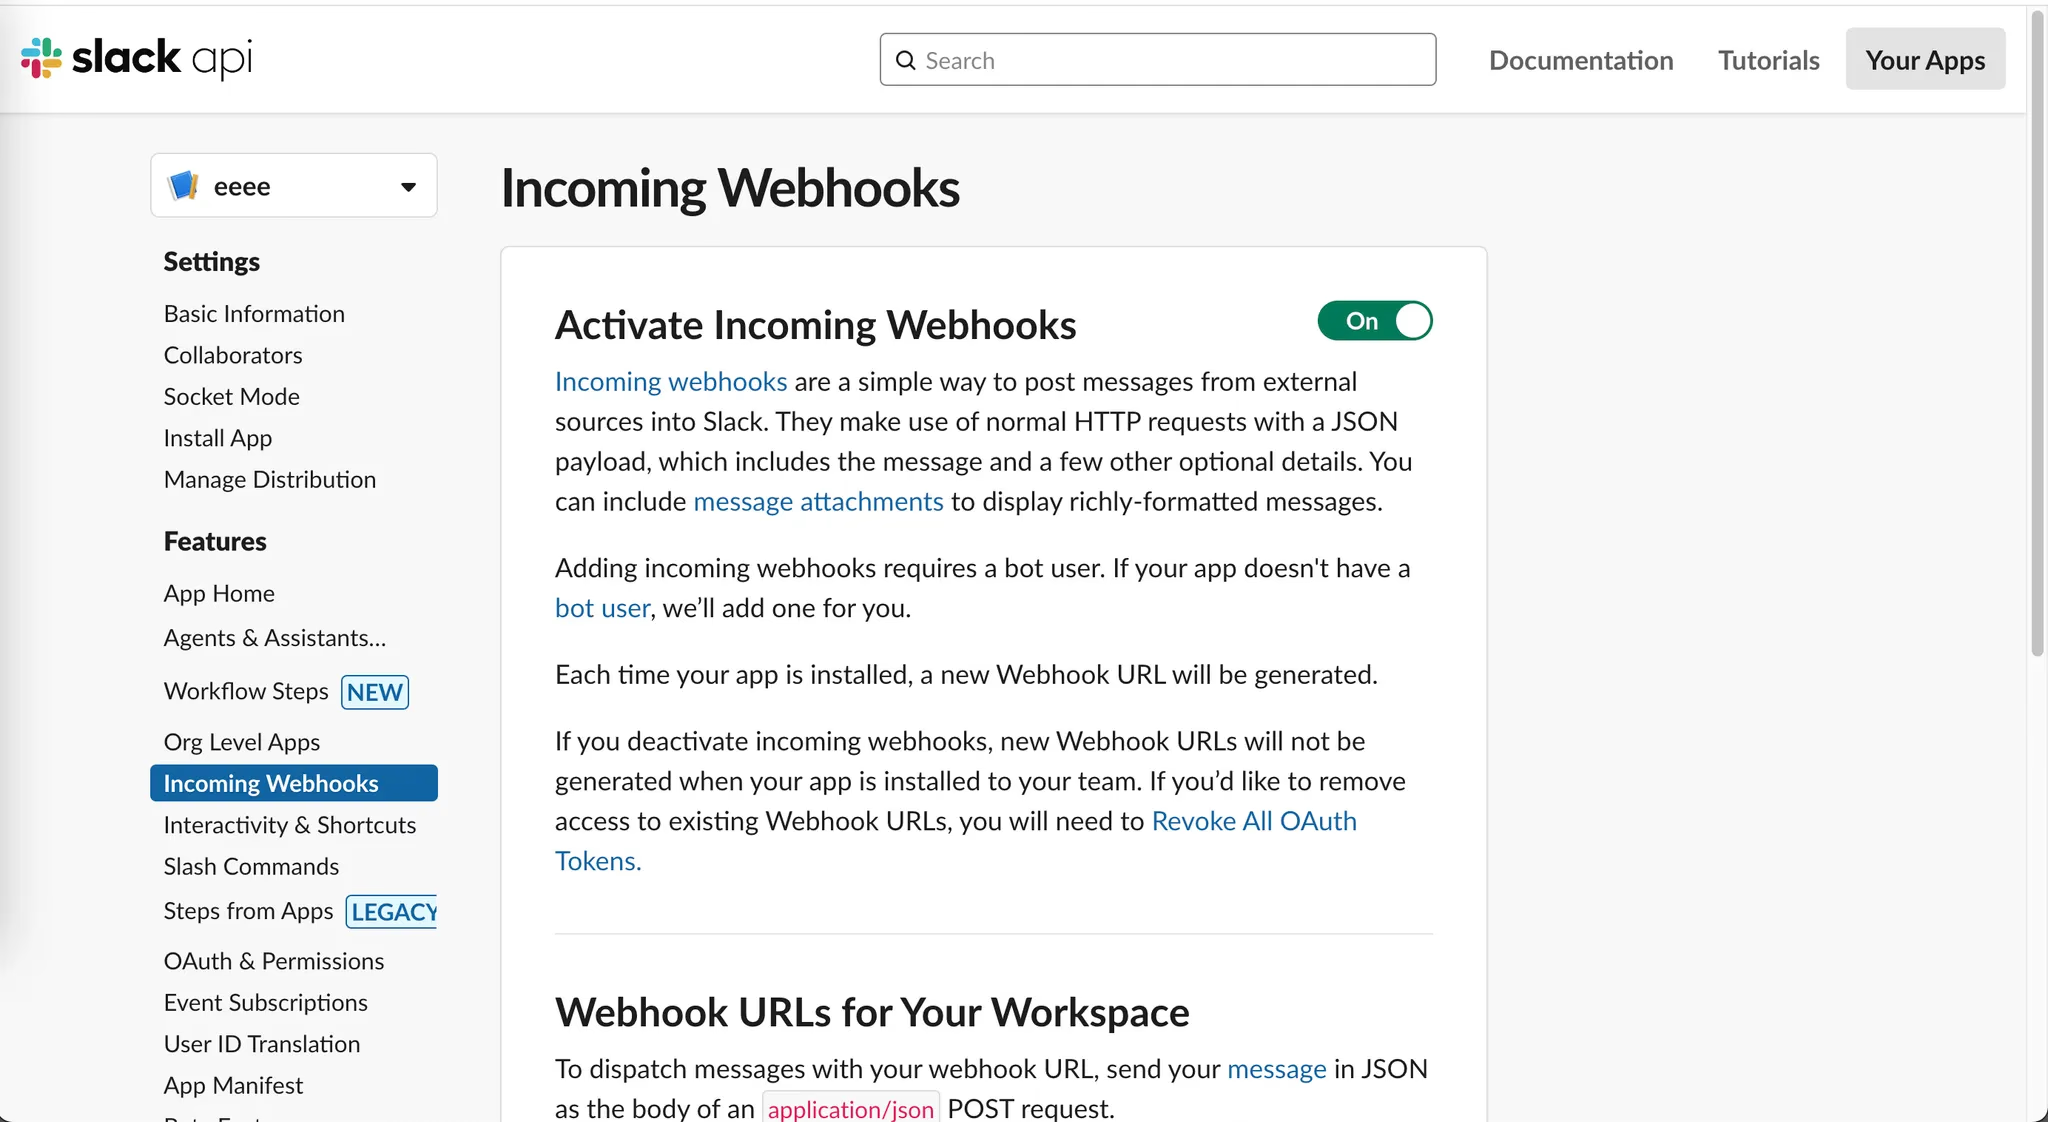
Click the
Add New Webhook to Workspacebutton.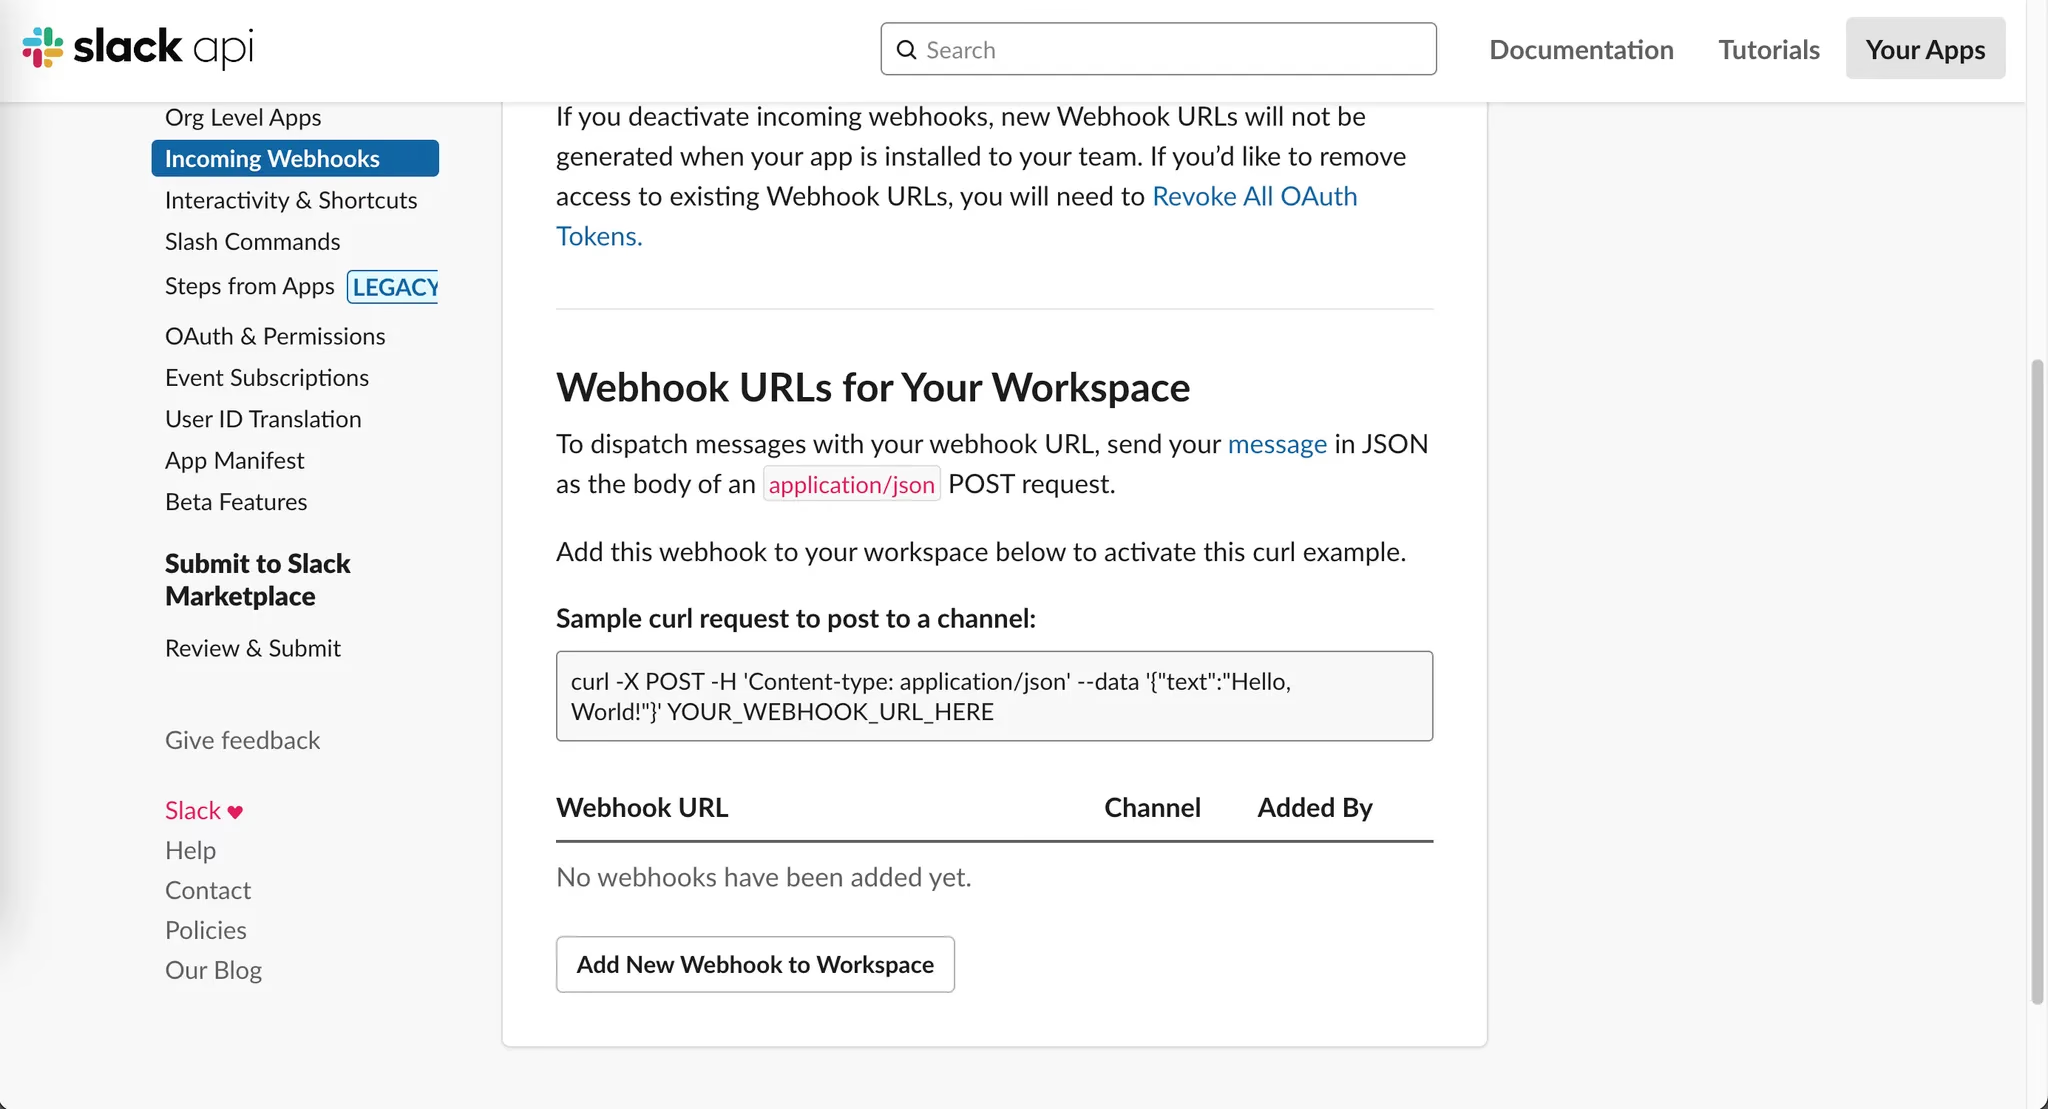
Select the channel you want to send alerts to, then copy the Webhook URL.
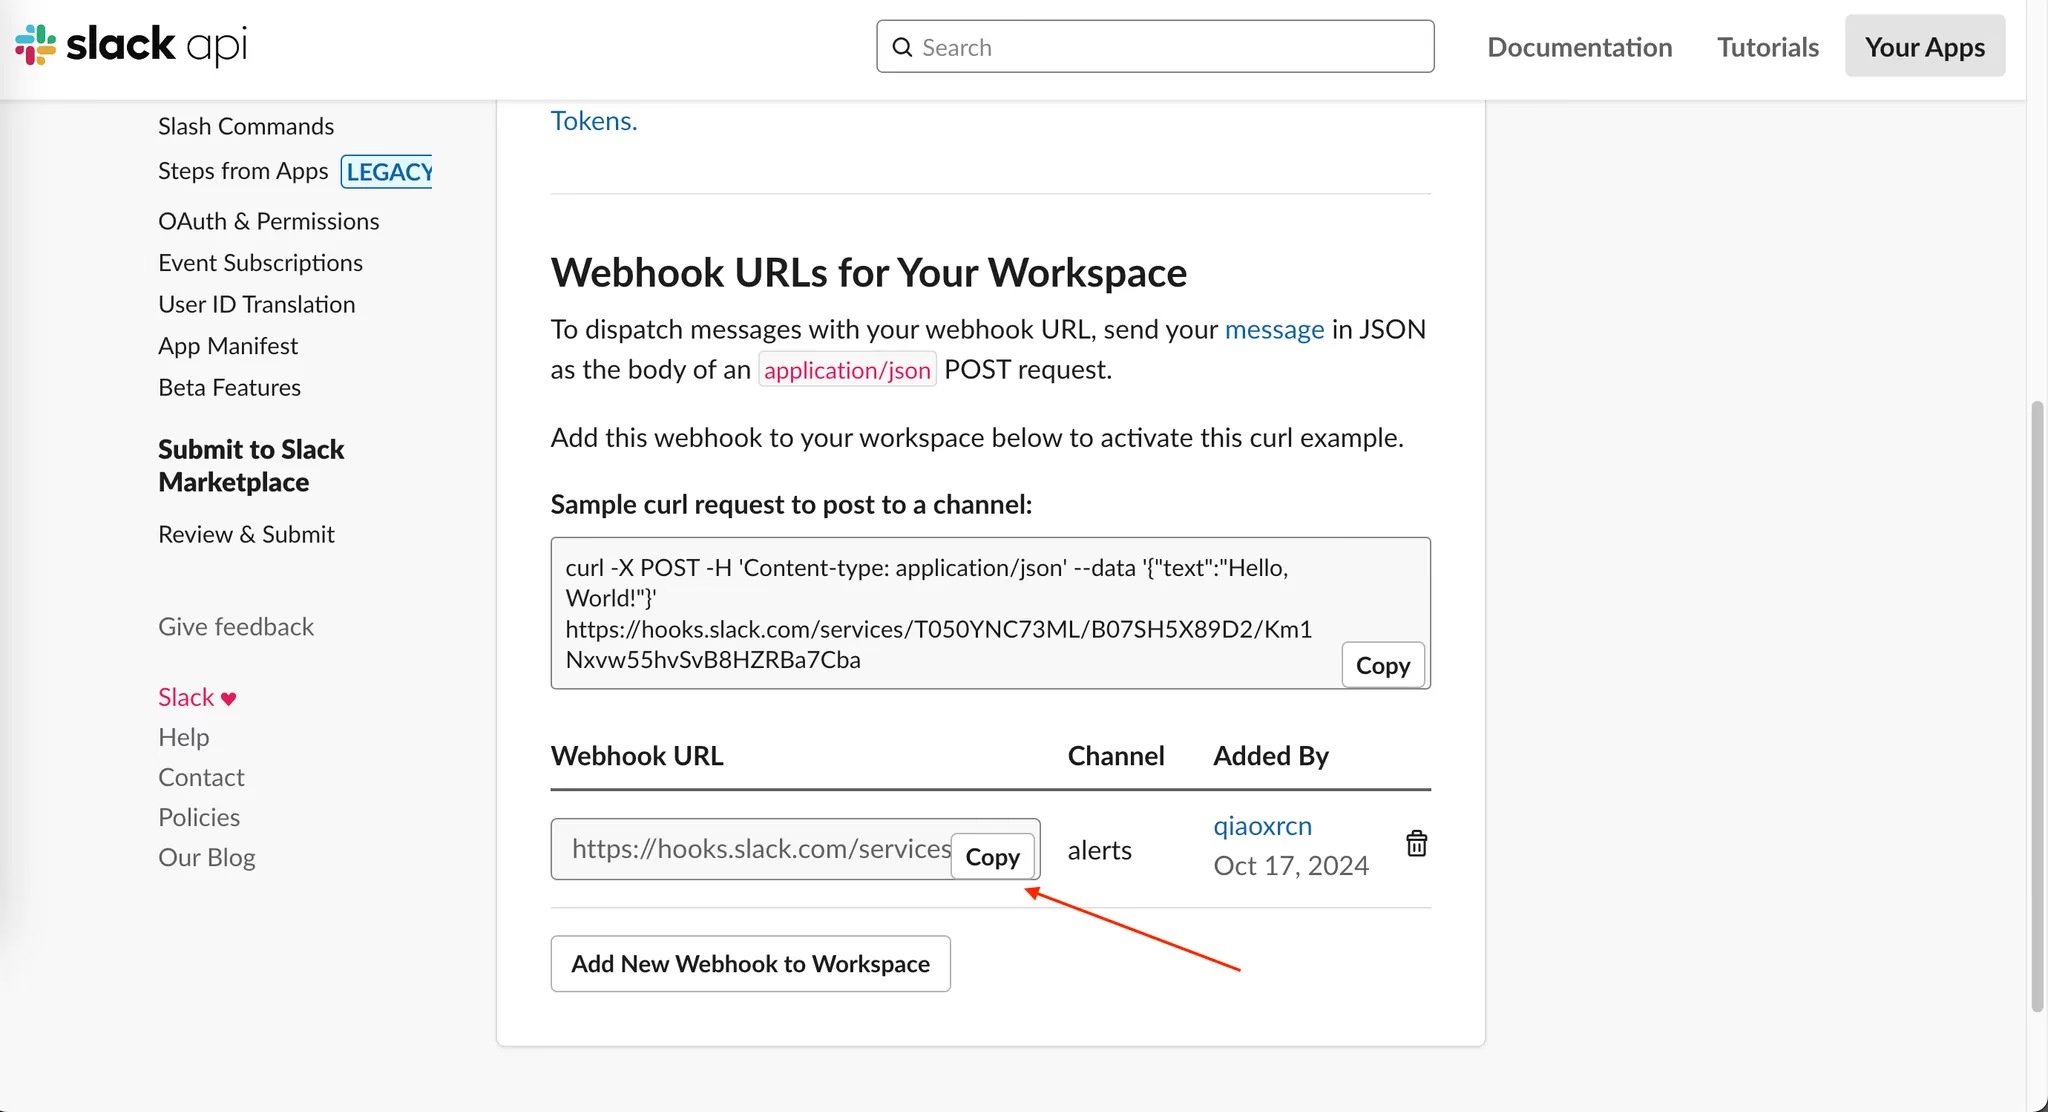
-
Edit the Config File
Edit
./values/alert-manager.yamlto replace it with your webhook URL and your Slack channel name.kube-prometheus-stack:alertmanager:config:global:resolve_timeout: 5mslack_api_url: 'https://hooks.slack.com/services/xxxxxxxxxxx/xxxxxxxxxxx/xxxxxxxxxxxxxxxxxxxxxxxx' # your webhook urlreceivers:- name: 'slack-alerts'slack_configs:- channel: '#scroll-webhook' #your channel namesend_resolved: truetext: '{{ .CommonAnnotations.description }}'title: '{{ .CommonAnnotations.summary }}'route:group_by: ['alertname']receiver: 'slack-alerts'routes:- matchers: []receiver: 'slack-alerts'This configuration file will send all alerts to your Slack channel. If you need more complex rules, refer to the Prometheus Alerting Configuration Documentation.
-
Update to alertmanager
Use the following command to update Alertmanager:
helm upgrade --reuse-values -i scroll-monitor oci://ghcr.io/scroll-tech/scroll-sdk/helm/scroll-monitor -n $(NAMESPACE) \--values ./values/alert-manager.yaml